Newer
Older
1
2
3
4
5
6
7
8
9
10
11
12
13
14
15
16
17
18
19
20
21
22
23
24
25
26
27
28
29
30
31
32
33
34
35
36
37
38
39
40
41
42
43
44
45
46
47
48
49
50
51
52
53
54
55
56
57
58
59
60
61
62
63
64
65
66
67
68
69
70
71
72
73
74
75
76
77
78
79
80
81
82
83
84
85
86
87
88
89
90
91
92
93
94
95
96
97
98
99
100
101
102
103
104
105
106
107
108
109
110
111
112
113
114
115
116
117
118
119
120
121
122
123
124
125
126
127
128
129
130
131
132
133
134
135
136
137
138
139
140
141
142
143
144
145
146
147
148
149
150
151
152
153
154
155
156
157
158
159
160
161
162
163
164
165
166
167
168
169
170
171
172
173
174
175
176
177
178
179
180
181
182
183
184
185
186
187
188
189
190
191
192
193
194
195
196
197
198
199
200
201
202
203
204
205
206
207
208
209
210
211
212
213
214
215
216
217
218
219
220
221
222
223
224
225
226
227
228
229
230
231
232
233
234
235
236
237
238
239
240
241
242
243
244
245
246
247
248
249
250
251
252
253
254
255
256
257
258
259
260
261
262
263
264
265
266
267
268
269
270
271
272
273
274
275
276
277
278
279
280
281
282
283
284
285
286
287
288
289
290
291
292
293
294
295
296
297
298
299
300
301
302
303
304
305
306
307
308
309
310
311
312
313
314
315
316
317
318
319
320
321
322
323
324
325
326
327
328
329
330
331
332
333
334
335
336
337
338
339
340
341
342
343
344
345
346
347
348
349
350
351
352
353
354
355
356
357
358
359
360
361
362
363
364
365
366
367
368
369
370
371
372
373
374
375
376
377
378
379
380
381
382
383
384
385
386
387
388
389
390
391
392
393
394
395
396
397
398
399
400
401
402
403
404
405
406
407
408
409
410
411
412
413
414
415
416
417
418
419
420
421
422
423
424
425
426
427
428
429
430
431
432
433
434
435
436
437
438
439
440
441
442
443
444
445
446
447
448
449
450
451
452
453
454
455
456
457
458
459
460
461
462
463
464
465
466
467
468
469
470
471
472
473
474
475
476
477
478
479
480
481
482
483
484
485
486
487
488
489
490
491
492
493
494
495
496
497
498
499
500
501
502
503
504
505
506
507
508
509
510
511
512
513
514
515
516
517
518
519
520
521
522
523
524
525
526
527
528
529
530
531
532
533
534
535
536
537
538
539
540
541
542
543
544
545
546
547
548
549
550
551
552
553
554
555
556
557
558
559
560
561
562
563
564
565
566
567
568
569
570
571
572
573
574
575
576
577
578
579
580
581
582
583
584
585
586
587
588
589
590
591
592
593
594
595
596
597
598
599
600
601
602
603
604
605
606
607
608
609
610
611
612
613
614
615
616
617
618
619
620
621
622
623
624
625
626
627
628
629
630
631
632
633
634
635
636
637
638
639
640
641
642
643
644
645
646
647
648
649
650
651
652
653
654
655
656
657
658
659
660
661
662
663
664
665
666
667
668
669
670
671
672
673
674
675
676
677
678
679
680
681
682
683
684
685
686
687
688
689
690
691
692
693
694
695
696
697
698
699
700
701
702
703
704
705
706
707
708
709
710
711
712
713
714
715
716
717
718
719
720
721
722
723
724
725
726
727
728
729
730
731
732
733
734
735
736
737
738
739
740
741
742
743
744
745
746
747
748
749
750
751
752
753
754
755
756
757
758
759
760
761
762
763
764
765
766
767
768
769
770
771
772
773
774
775
776
777
778
779
780
781
782
783
784
785
786
787
788
789
790
791
792
793
794
795
796
797
798
799
800
801
802
803
804
805
806
807
808
809
810
811
812
813
814
815
816
817
818
819
820
821
822
823
824
825
826
827
828
829
830
831
832
833
834
835
836
837
838
839
840
841
842
843
844
845
846
847
848
849
850
851
852
853
854
855
856
857
858
859
860
861
862
863
864
865
866
867
868
869
870
871
872
873
874
875
876
877
878
879
880
881
882
883
884
885
886
887
888
889
890
891
892
893
894
895
896
897
898
899
900
901
902
903
904
905
906
907
908
909
910
911
912
913
914
915
916
917
918
919
920
921
922
923
924
925
926
927
928
929
930
931
932
933
934
935
936
937
938
939
940
941
942
943
944
945
946
947
948
949
950
951
952
953
954
955
956
957
958
959
960
961
962
963
964
965
966
967
968
969
970
971
972
973
974
975
976
977
978
979
980
981
982
983
984
985
986
987
988
989
990
991
992
993
994
995
996
997
998
999
1000

Hackathon Starter
=======================
[](https://david-dm.org/sahat/hackathon-starter) [](https://travis-ci.org/sahat/hackathon-starter) [](https://gitter.im/sahat/hackathon-starter?utm_source=badge&utm_medium=badge&utm_campaign=pr-badge&utm_content=badge)
**Live Demo**: https://hackathon-starter-2018.herokuapp.com
Jump to [What's new?](https://github.com/sahat/hackathon-starter/blob/master/CHANGELOG.md)
A boilerplate for **Node.js** web applications.
If you have attended any hackathons in the past, then you know how much time it takes to
get a project started: decide on what to build, pick a programming language, pick a web framework,
pick a CSS framework. A while later, you might have an initial project up on GitHub and only then
can other team members start contributing. Or how about doing something as simple as *Sign in with Facebook*
authentication? You can spend hours on it if you are not familiar with how OAuth 2.0 works.
When I started this project, my primary focus was on **simplicity** and **ease of use**.
I also tried to make it as **generic** and **reusable** as possible to cover most use cases of hackathon web apps,
without being too specific. In the worst case you can use this as a learning guide for your projects,
if for example you are only interested in **Sign in with Google** authentication and nothing else.
### Testimonials
> [**“Nice! That README alone is already gold!”**](https://www.producthunt.com/tech/hackathon-starter#comment-224732)<br>
> — Adrian Le Bas
> [**“Awesome. Simply awesome.”**](https://www.producthunt.com/tech/hackathon-starter#comment-224966)<br>
> — Steven Rueter
> [**“I'm using it for a year now and many projects, it's an awesome boilerplate and the project is well maintained!”**](https://www.producthunt.com/tech/hackathon-starter#comment-228610)<br>
> — Kevin Granger
> **“Small world with Sahat's project. We were using his hackathon starter for our hackathon this past weekend and got some prizes. Really handy repo!”**<br>
> — Interview candidate for one of the companies I used to work with.
<h4 align="center">Modern Theme</h4>

<h4 align="center">Flatly Bootstrap Theme</h4>

<h4 align="center">API Examples</h4>
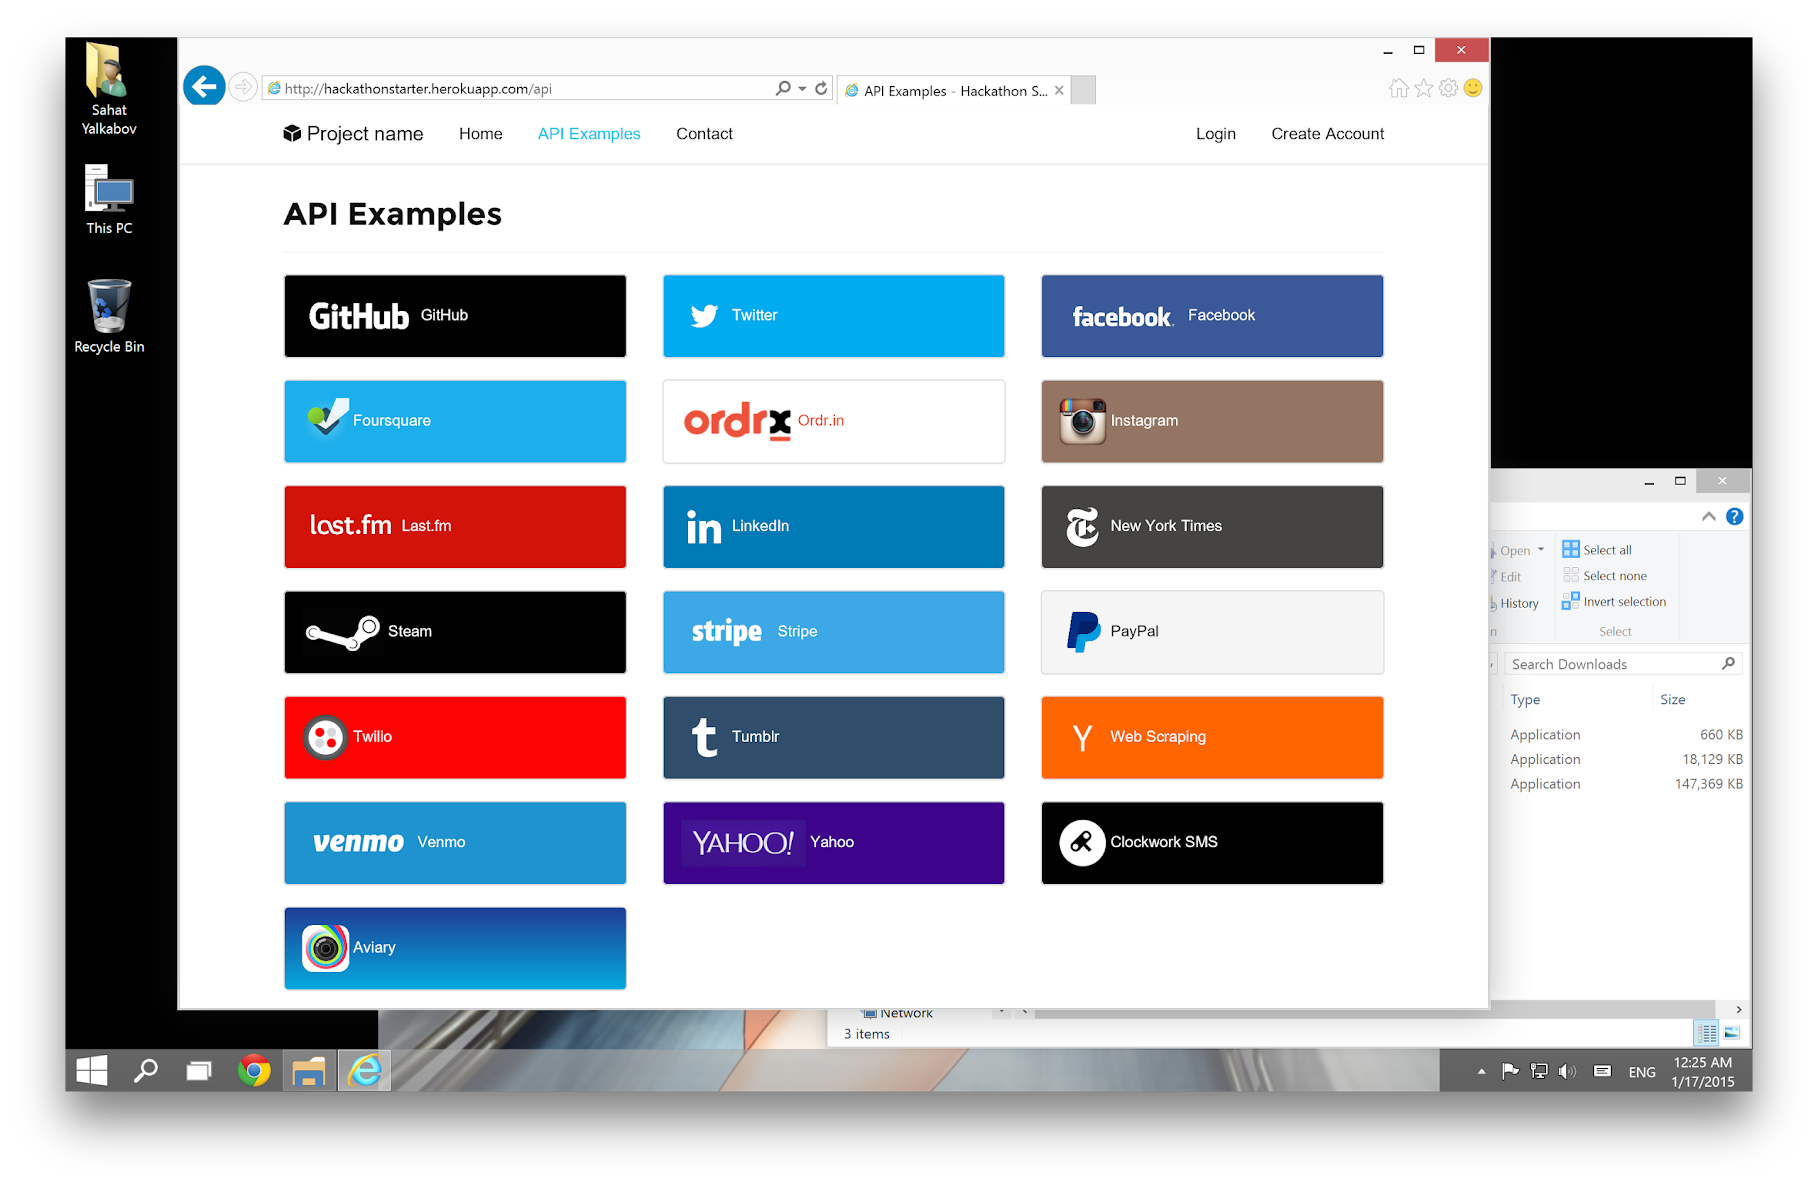
Table of Contents
-----------------
- [Features](#features)
- [Prerequisites](#prerequisites)
- [Getting Started](#getting-started)
- [Obtaining API Keys](#obtaining-api-keys)
- [Project Structure](#project-structure)
- [List of Packages](#list-of-packages)
- [Useful Tools and Resources](#useful-tools-and-resources)
- [Recommended Design Resources](#recommended-design-resources)
- [Recommended Node.js Libraries](#recommended-nodejs-libraries)
- [Recommended Client-side Libraries](#recommended-client-side-libraries)
- [Pro Tips](#pro-tips)
- [FAQ](#faq)
- [How It Works](#how-it-works-mini-guides)
- [Cheatsheets](#cheatsheets)
- [ES6](#-es6-cheatsheet)
- [JavaScript Date](#-javascript-date-cheatsheet)
- [Mongoose Cheatsheet](#mongoose-cheatsheet)
- [Deployment](#deployment)
- [Docker](#docker)
- [Changelog](#changelog)
- [Contributing](#contributing)
- [License](#license)
Features
--------
- **Local Authentication** using Email and Password
- **OAuth 1.0a Authentication** via Twitter
- **OAuth 2.0 Authentication** via Facebook, Google, GitHub, LinkedIn, Instagram
- Flash notifications
- MVC Project Structure
- Node.js clusters support
- Sass stylesheets (auto-compiled via middleware)
- Bootstrap 3 + Extra Themes
- Contact Form (powered by Mailgun, Sendgrid or Mandrill)
- **Account Management**
- Gravatar
- Profile Details
- Change Password
- Forgot Password
- Reset Password
- Link multiple OAuth strategies to one account
- Delete Account
- CSRF protection
- **API Examples**: Facebook, Foursquare, Last.fm, Tumblr, Twitter, Stripe, LinkedIn and more.
Prerequisites
-------------
- [MongoDB](https://www.mongodb.org/downloads)
- [Node.js 8.0+](http://nodejs.org)
- Command Line Tools
- <img src="http://deluge-torrent.org/images/apple-logo.gif" height="17"> **Mac OS X:** [Xcode](https://itunes.apple.com/us/app/xcode/id497799835?mt=12) (or **OS X 10.9+**: `xcode-select --install`)
- <img src="http://dc942d419843af05523b-ff74ae13537a01be6cfec5927837dcfe.r14.cf1.rackcdn.com/wp-content/uploads/windows-8-50x50.jpg" height="17"> **Windows:** [Visual Studio](https://www.visualstudio.com/products/visual-studio-community-vs) OR [Visaul Studio Code](https://code.visualstudio.com) + [Windows Subsystem for Linux - Ubuntu](https://docs.microsoft.com/en-us/windows/wsl/install-win10)
- <img src="https://lh5.googleusercontent.com/-2YS1ceHWyys/AAAAAAAAAAI/AAAAAAAAAAc/0LCb_tsTvmU/s46-c-k/photo.jpg" height="17"> **Ubuntu** / <img src="https://upload.wikimedia.org/wikipedia/commons/3/3f/Logo_Linux_Mint.png" height="17"> **Linux Mint:** `sudo apt-get install build-essential`
- <img src="http://i1-news.softpedia-static.com/images/extra/LINUX/small/slw218news1.png" height="17"> **Fedora**: `sudo dnf groupinstall "Development Tools"`
- <img src="https://en.opensuse.org/images/b/be/Logo-geeko_head.png" height="17"> **OpenSUSE:** `sudo zypper install --type pattern devel_basis`
**Note:** If you are new to Node or Express, I recommend to watch
[Node.js and Express 101](https://www.youtube.com/watch?v=BN0JlMZCtNU)
screencast by Alex Ford that teaches Node and Express from scratch. Alternatively,
here is another great tutorial for complete beginners - [Getting Started With Node.js, Express, MongoDB](http://cwbuecheler.com/web/tutorials/2013/node-express-mongo/).
Getting Started
---------------
The easiest way to get started is to clone the repository:
```bash
# Get the latest snapshot
git clone https://github.com/sahat/hackathon-starter.git myproject
# Change directory
cd myproject
# Install NPM dependencies
npm install
# Then simply start your app
node app.js
```
**Warning:** If you want to use some api that need https to work (for example pinterest or facebook),
you will need to download [ngrok](https://ngrok.com/).
You must start ngrok after starting the project.
```bash
# start ngrok to intercept the data exchanged on port 8080
./ngrok http 8080
```
Next, you must use the https url defined by ngrok, for example `https://hackaton.ngrok.io`
**Note:** I highly recommend installing [Nodemon](https://github.com/remy/nodemon).
It watches for any changes in your node.js app and automatically restarts the
server. Once installed, instead of `node app.js` use `nodemon app.js`. It will
save you a lot of time in the long run, because you won't need to manually
restart the server each time you make a small change in code. To install, run
`sudo npm install -g nodemon`.
Obtaining API Keys
------------------
To use any of the included APIs or OAuth authentication methods, you will need
to obtain appropriate credentials: Client ID, Client Secret, API Key, or
Username & Password. You will need to go through each provider to generate new
credentials.
**Hackathon Starter 2.0 Update:** I have included dummy keys and passwords for
all API examples to get you up and running even faster. But don't forget to update
them with *your credentials* when you are ready to deploy an app.
<img src="https://upload.wikimedia.org/wikipedia/commons/thumb/2/2f/Google_2015_logo.svg/1000px-Google_2015_logo.svg.png" width="200">
- Visit <a href="https://cloud.google.com/console/project" target="_blank">Google Cloud Console</a>
- Click on the **Create Project** button
- Enter *Project Name*, then click on **Create** button
- Then click on *APIs & auth* in the sidebar and select *API* tab
- Click on **Google+ API** under *Social APIs*, then click **Enable API**
- Next, under *APIs & auth* in the sidebar click on *Credentials* tab
- Click on **Create new Client ID** button
- Select *Web Application* and click on **Configure Consent Screen**
- Fill out the required fields then click on **Save**
- In the *Create Client ID* modal dialog:
- **Application Type**: Web Application
- **Authorized Javascript origins**: http://localhost:8080
- **Authorized redirect URI**: http://localhost:8080/auth/google/callback
- Click on **Create Client ID** button
- Copy and paste *Client ID* and *Client secret* keys into `.env`
**Note:** When you ready to deploy to production don't forget to
add your new url to *Authorized Javascript origins* and *Authorized redirect URI*,
e.g. `http://my-awesome-app.herokuapp.com` and
`http://my-awesome-app.herokuapp.com/auth/google/callback` respectively.
The same goes for other providers.
<hr>
<img src="http://www.doit.ba/img/facebook.jpg" width="200">
- Visit <a href="https://developers.facebook.com/" target="_blank">Facebook Developers</a>
- Click **My Apps**, then select **Add a New App* from the dropdown menu
- Enter a new name for your app
- Click on the **Create App ID** button
- Find the Facebook Login Product and click on **Facebook Login**
- Instead of going through their Quickstart, click on **Settings** for your app in the top left corner
- Copy and paste *App ID* and *App Secret* keys into `.env`
- **Note:** *App ID* is **FACEBOOK_ID**, *App Secret* is **FACEBOOK_SECRET** in `.env`
- Enter `localhost` under *App Domains*
- Choose a **Category** that best describes your app
- Click on **+ Add Platform** and select **Website**
- Enter `http://localhost:8080` under *Site URL*
- Click on the *Settings* tab in the left nav under Facebook Login
- Enter `http://localhost:8080/auth/facebook/callback` under Valid OAuth redirect URIs
**Note:** After a successful sign in with Facebook, a user will be redirected back to home page with appended hash `#_=_` in the URL. It is *not* a bug. See this [Stack Overflow](https://stackoverflow.com/questions/7131909/facebook-callback-appends-to-return-url) discussion for ways to handle it.
<hr>
<img src="https://github.global.ssl.fastly.net/images/modules/logos_page/GitHub-Logo.png" width="200">
- Go to <a href="https://github.com/settings/profile" target="_blank">Account Settings</a>
- Select **Developer settings** from the sidebar
- Then inside click on **Register new application**
- Enter *Application Name* and *Homepage URL*
- For *Authorization Callback URL*: http://localhost:8080/auth/github/callback
- Click **Register application**
- Now copy and paste *Client ID* and *Client Secret* keys into `.env` file
<hr>
<img src="https://g.twimg.com/ios_homescreen_icon.png" width="90">
- Sign in at <a href="https://apps.twitter.com/" target="_blank">https://apps.twitter.com</a>
- Click **Create a new application**
- Enter your application name, website and description
- For **Callback URL**: http://127.0.0.1:8080/auth/twitter/callback
- Go to **Settings** tab
- Under *Application Type* select **Read and Write** access
- Check the box **Allow this application to be used to Sign in with Twitter**
- Click **Update this Twitter's applications settings**
- Copy and paste *Consumer Key* and *Consumer Secret* keys into `.env` file
<hr>
<img src="http://www.danpontefract.com/wp-content/uploads/2014/02/logo-linkedin.png" width="200">
- Sign in at <a href="https://developer.linkedin.com/" target="_blank">LinkedIn Developer Network</a>
- From the account name dropdown menu select **API Keys**
- *It may ask you to sign in once again*
- Click **+ Add New Application** button
- Fill out all the *required* fields
- **OAuth 2.0 Redirect URLs**: http://localhost:8080/auth/linkedin/callback
- **JavaScript API Domains**: http://localhost:8080
- For **Default Application Permissions** make sure at least the following is checked:
- `r_basicprofile`
- Finish by clicking **Add Application** button
- Copy and paste *API Key* and *Secret Key* keys into `.env` file
- *API Key* is your **clientID**
- *Secret Key* is your **clientSecret**
<hr>
<img src="https://stripe.com/img/about/logos/logos/black@2x.png" width="200">
- <a href="https://stripe.com/" target="_blank">Sign up</a> or log into your <a href="https://manage.stripe.com" target="_blank">dashboard</a>
- Click on your profile and click on Account Settings
- Then click on **API Keys**
- Copy the **Secret Key**. and add this into `.env` file
<hr>
<img src="https://pixabay.com/static/uploads/photo/2015/05/26/09/37/paypal-784404_960_720.png" width="200">
- Visit <a href="https://developer.paypal.com" target="_blank">PayPal Developer</a>
- Log in to your PayPal account
- Click **Applications > Create App** in the navigation bar
- Enter *Application Name*, then click **Create app**
- Copy and paste *Client ID* and *Secret* keys into `.env` file
- *App ID* is **client_id**, *App Secret* is **client_secret**
- Change **host** to api.paypal.com if you want to test against production and use the live credentials
<hr>
<img src="http://33.media.tumblr.com/ffaf0075be879b3ab0b87f0b8bcc6814/tumblr_inline_n965bkOymr1qzxhga.png" width="200">
- Go to <a href="https://developer.foursquare.com" target="_blank">Foursquare for Developers</a>
- Click on **My Apps** in the top menu
- Click the **Create A New App** button
- Enter *App Name*, *Welcome page url*,
- For **Redirect URI**: http://localhost:8080/auth/foursquare/callback
- Click **Save Changes**
- Copy and paste *Client ID* and *Client Secret* keys into `.env` file
<hr>
<img src="http://img4.wikia.nocookie.net/__cb20130520163346/logopedia/images/8/8d/Tumblr_logo_by_x_1337_x-d5ikwpp.png" width="200">
- Go to <a href="http://www.tumblr.com/oauth/apps" target="_blank">http://www.tumblr.com/oauth/apps</a>
- Once signed in, click **+Register application**
- Fill in all the details
- For **Default Callback URL**: `http://localhost:8080/auth/tumblr/callback`
- Click **✔Register**
- Copy and paste *OAuth consumer key* and *OAuth consumer secret* keys into `.env` file
<hr>
<img src="https://upload.wikimedia.org/wikipedia/commons/a/ae/Steam_logo.svg" width="200">
- Go to <a href="http://steamcommunity.com/dev/apikey" target="_blank">http://steamcommunity.com/dev/apikey</a>
- Sign in with your existing Steam account
- Enter your *Domain Name*, then and click **Register**
- Copy and paste *Key* into `.env` file
<hr>
<img src="https://sendgrid.com/brand/sg-logo-300.png" width="200">
- Go to <a href="https://sendgrid.com/user/signup" target="_blank">https://sendgrid.com/user/signup</a>
- Sign up and **confirm** your account via the *activation email*
- Then enter your SendGrid *Username* and *Password* into `.env` file
<hr>
<img src="https://raw.github.com/mailgun/media/master/Mailgun_Primary.png" width="200">
- Go to <a href="http://www.mailgun.com" target="_blank">http://www.mailgun.com</a>
- Sign up and add your *Domain Name*
- From the domain overview, copy and paste the default SMTP *Login* and *Password* into `.env` file
<hr>
<img src="https://s3.amazonaws.com/ahoy-assets.twilio.com/global/images/wordmark.svg" width="200">
- Go to <a href="https://www.twilio.com/try-twilio" target="_blank">https://www.twilio.com/try-twilio</a>
- Sign up for an account.
- Once logged into the dashboard, expand the link 'show api credentials'
- Copy your Account Sid and Auth Token
Project Structure
-----------------
| Name | Description |
| ---------------------------------- | ------------------------------------------------------------ |
| **config**/passport.js | Passport Local and OAuth strategies, plus login middleware. |
| **controllers**/api.js | Controller for /api route and all api examples. |
| **controllers**/contact.js | Controller for contact form. |
| **controllers**/home.js | Controller for home page (index). |
| **controllers**/user.js | Controller for user account management. |
| **models**/User.js | Mongoose schema and model for User. |
| **public**/ | Static assets (fonts, css, js, img). |
| **public**/**js**/application.js | Specify client-side JavaScript dependencies. |
| **public**/**js**/main.js | Place your client-side JavaScript here. |
| **public**/**css**/main.scss | Main stylesheet for your app. |
| **public/css/themes**/default.scss | Some Bootstrap overrides to make it look prettier. |
| **views/account**/ | Templates for *login, password reset, signup, profile*. |
| **views/api**/ | Templates for API Examples. |
| **views/partials**/flash.pug | Error, info and success flash notifications. |
| **views/partials**/header.pug | Navbar partial template. |
| **views/partials**/footer.pug | Footer partial template. |
| **views**/layout.pug | Base template. |
| **views**/home.pug | Home page template. |
| .dockerignore | Folder and files ignored by docker usage. |
| .env.example | Your API keys, tokens, passwords and database URI. |
| .eslintrc | Rules for eslint linter. |
| .gitignore | Folder and files ignored by git. |
| .travis.yml | Configuration files for continue integration. |
| app.js | The main application file. |
| docker-compose.yml | Docker compose configuration file. |
| Dockerfile | Docker configuration file. |
| package.json | NPM dependencies. |
| package-lock.json | Contains exact versions of NPM dependencies in package.json. |
**Note:** There is no preference how you name or structure your views.
You could place all your templates in a top-level `views` directory without
having a nested folder structure, if that makes things easier for you.
Just don't forget to update `extends ../layout` and corresponding
`res.render()` paths in controllers.
List of Packages
----------------
| Package | Description |
| ------------------------------- | ------------------------------------------------------------------------|
| @octokit/rest | GitHub API library. |
| bcrypt-nodejs | Library for hashing and salting user passwords. |
| body-parser | Node.js body parsing middleware. |
| chai | BDD/TDD assertion library. |
| chalk | Terminal string styling done right. |
| cheerio | Scrape web pages using jQuery-style syntax. |
| clockwork | Clockwork SMS API library. |
| compression | Node.js compression middleware. |
| connect-mongo | MongoDB session store for Express. |
| dotenv | Loads environment variables from .env file. |
| errorhandler | Development-only error handler middleware. |
| eslint | Linter JavaScript. |
| eslint-config-airbnb-base | Configuration eslint by airbnb. |
| eslint-plugin-chai-friendly | Makes eslint friendly towards Chai.js 'expect' and 'should' statements. |
| eslint-plugin-import | ESLint plugin with rules that help validate proper imports. |
| express | Node.js web framework. |
| express-flash | Provides flash messages for Express. |
| express-session | Simple session middleware for Express. |
| express-status-monitor | Reports real-time server metrics for Express. |
| express-validator | Easy form validation for Express. |
| fbgraph | Facebook Graph API library. |
| instagram-node | Instagram API library. |
| lastfm | Last.fm API library. |
| lob | Lob API library. |
| lusca | CSRF middleware. |
| mocha | Test framework. |
| mongoose | MongoDB ODM. |
| morgan | HTTP request logger middleware for node.js. |
| multer | Node.js middleware for handling `multipart/form-data`. |
| node-foursquare | Foursquare API library. |
| node-linkedin | LinkedIn API library. |
| node-sass | Node.js bindings to libsass. |
| node-sass-middleware | Sass middleware compiler. |
| nyc | Coverage test. |
| nodemailer | Node.js library for sending emails. |
| passport | Simple and elegant authentication library for node.js. |
| passport-facebook | Sign-in with Facebook plugin. |
| passport-github | Sign-in with GitHub plugin. |
| passport-google-oauth | Sign-in with Google plugin. |
| passport-instagram | Sign-in with Instagram plugin. |
| passport-linkedin-oauth2 | Sign-in with LinkedIn plugin. |
| passport-local | Sign-in with Username and Password plugin. |
| passport-openid | Sign-in with OpenId plugin. |
| passport-oauth | Allows you to set up your own OAuth 1.0a and OAuth 2.0 strategies. |
| passport-twitter | Sign-in with Twitter plugin. |
| paypal-rest-sdk | PayPal APIs library. |
| pug (jade) | Template engine for Express. |
| request | Simplified HTTP request library. |
| sinon | Test spies, stubs and mocks for JavaScript. |
| sinon-mongoose | Extend Sinon stubs for Mongoose methods to test chained methods easily. |
| stripe | Offical Stripe API library. |
| supertest | HTTP assertion library. |
| tumblr.js | Tumblr API library. |
| twilio | Twilio API library. |
| twit | Twitter API library. |
| validator | Used in conjunction with express-validator in **controllers/api.js**. |
Useful Tools and Resources
--------------------------
- [JavaScripting](http://www.javascripting.com/) - The Database of JavaScript Libraries
- [JS Recipes](http://sahatyalkabov.com/jsrecipes/) - JavaScript tutorials for backend and frontend development.
- [HTML to Pug converter](https://html-to-pug.com/) - HTML to PUG is a free online converter helping you to convert html files to pug syntax in realtime.
- [JavascriptOO](http://www.javascriptoo.com/) - A directory of JavaScript libraries with examples, CDN links, statistics, and videos.
- [Favicon Generator](http://realfavicongenerator.net/) - Generate favicons for PC, Android, iOS, Windows 8.
Recommended Design Resources
----------------------------
- [Code Guide](http://codeguide.co/) - Standards for developing flexible, durable, and sustainable HTML and CSS.
- [Bootsnipp](http://bootsnipp.com/) - Code snippets for Bootstrap.
- [UIBox](http://www.uibox.in) - Curated HTML, CSS, JS, UI components.
- [Bootstrap Zero](https://www.bootstrapzero.com) - Free Bootstrap templates themes.
- [Google Bootstrap](http://todc.github.io/todc-bootstrap/) - Google-styled theme for Bootstrap.
- [Font Awesome Icons](http://fortawesome.github.io/Font-Awesome/icons/) - It's already part of the Hackathon Starter, so use this page as a reference.
- [Colors](http://clrs.cc) - A nicer color palette for the web.
- [Creative Button Styles](http://tympanus.net/Development/CreativeButtons/) - awesome button styles.
- [Creative Link Effects](http://tympanus.net/Development/CreativeLinkEffects/) - Beautiful link effects in CSS.
- [Medium Scroll Effect](http://codepen.io/andreasstorm/pen/pyjEh) - Fade in/out header background image as you scroll.
- [GeoPattern](https://github.com/btmills/geopattern) - SVG background pattern generator.
- [Trianglify](https://github.com/qrohlf/trianglify) - SVG low-poly background pattern generator.
Recommended Node.js Libraries
-----------------------------
- [Nodemon](https://github.com/remy/nodemon) - Automatically restart Node.js server on code changes.
- [geoip-lite](https://github.com/bluesmoon/node-geoip) - Geolocation coordinates from IP address.
- [Filesize.js](http://filesizejs.com/) - Pretty file sizes, e.g. `filesize(265318); // "265.32 kB"`.
- [Numeral.js](http://numeraljs.com) - Library for formatting and manipulating numbers.
- [Node Inspector](https://github.com/node-inspector/node-inspector) - Node.js debugger based on Chrome Developer Tools.
- [node-taglib](https://github.com/nikhilm/node-taglib) - Library for reading the meta-data of several popular audio formats.
- [sharp](https://github.com/lovell/sharp) - Node.js module for resizing JPEG, PNG, WebP and TIFF images.
Recommended Client-side Libraries
---------------------------------
- [Framework7](http://www.idangero.us/framework7/) - Full Featured HTML Framework For Building iOS7 Apps.
- [InstantClick](http://instantclick.io) - Makes your pages load instantly by pre-loading them on mouse hover.
- [NProgress.js](https://github.com/rstacruz/nprogress) - Slim progress bars like on YouTube and Medium.
- [Hover](https://github.com/IanLunn/Hover) - Awesome CSS3 animations on mouse hover.
- [Magnific Popup](http://dimsemenov.com/plugins/magnific-popup/) - Responsive jQuery Lightbox Plugin.
- [jQuery Raty](http://wbotelhos.com/raty/) - Star Rating Plugin.
- [Headroom.js](http://wicky.nillia.ms/headroom.js/) - Hide your header until you need it.
- [X-editable](http://vitalets.github.io/x-editable/) - Edit form elements inline.
- [Offline.js](http://github.hubspot.com/offline/docs/welcome/) - Detect when user's internet connection goes offline.
- [Alertify.js](http://fabien-d.github.io/alertify.js/) - Sweet looking alerts and browser dialogs.
- [selectize.js](http://brianreavis.github.io/selectize.js/) - Styleable select elements and input tags.
- [drop.js](http://github.hubspot.com/drop/docs/welcome/) - Powerful Javascript and CSS library for creating dropdowns and other floating displays.
- [scrollReveal.js](https://github.com/jlmakes/scrollReveal.js) - Declarative on-scroll reveal animations.
Pro Tips
--------
- When installing an NPM package, add a *--save* flag, and it will be automatically
added to `package.json` as well. For example, `npm install --save moment`.
- Use [async.parallel()](https://github.com/caolan/async#parallel) when you need to run multiple
asynchronous tasks, and then render a page, but only when all tasks are completed. For example, you might
want to scrape 3 different websites for some data and render the results in a template
after all 3 websites have been scraped.
- Need to find a specific object inside an Array? Use [_.find](http://lodash.com/docs#find)
function from Lodash. For example, this is how you would retrieve a
Twitter token from database: `var token = _.find(req.user.tokens, { kind: 'twitter' });`,
where 1st parameter is an array, and a 2nd parameter is an object to search for.
FAQ
---
### Why do I get `403 Error: Forbidden` when submitting a form?
You need to add the following hidden input element to your form. This has been
added in the [pull request #40](https://github.com/sahat/hackathon-starter/pull/40)
as part of the CSRF protection.
```
input(type='hidden', name='_csrf', value=_csrf)
```
**Note:** It is now possible to whitelist certain URLs. In other words you can
specify a list of routes that should bypass CSRF verification check.
**Note 2:** To whitelist dynamic URLs use regular expression tests inside the
CSRF middleware to see if `req.originalUrl` matches your desired pattern.
### I am getting MongoDB Connection Error, how do I fix it?
That's a custom error message defined in `app.js` to indicate that there was a
problem connecting to MongoDB:
```js
mongoose.connection.on('error', () => {
console.error('MongoDB Connection Error. Please make sure MongoDB is running.');
});
```
You need to have a MongoDB server running before launching `app.js`. You can
download MongoDB [here](http://mongodb.org/downloads), or install it via a package manager.
<img src="http://dc942d419843af05523b-ff74ae13537a01be6cfec5927837dcfe.r14.cf1.rackcdn.com/wp-content/uploads/windows-8-50x50.jpg" height="17">
Windows users, read [Install MongoDB on Windows](https://docs.mongodb.org/manual/tutorial/install-mongodb-on-windows/).
**Tip:** If you are always connected to the internet, you could just use
[mLab](https://mlab.com/) or [Compose](https://www.compose.io/) instead
of downloading and installing MongoDB locally. You will only need to update database credentials
in `.env` file.
### I get an error when I deploy my app, why?
Chances are you haven't changed the *Database URI* in `.env`. If `MONGODB` is
set to `localhost`, it will only work on your machine as long as MongoDB is
running. When you deploy to Heroku, OpenShift or some other provider, you will not have MongoDB
running on `localhost`. You need to create an account with [mLab](https://mongolab.com/)
or [Compose](https://www.compose.io/), then create a free tier database.
See [Deployment](#deployment) for more information on how to setup an account
and a new database step-by-step with mLab.
### Why Pug (Jade) instead of Handlebars?
When I first started this project I didn't have any experience with Handlebars. Since then I have worked on Ember.js apps and got myself familiar with the Handlebars syntax. While it is true Handlebars is easier, because it looks like good old HTML, I have no regrets picking Jade over Handlebars. First off, it's the default template engine in Express, so someone who has built Express apps in the past already knows it. Secondly, I find `extends` and `block` to be indispensable, which as far as I know, Handlebars does not have out of the box. And lastly, subjectively speaking, Jade looks much cleaner and shorter than Handlebars, or any non-HAML style for that matter.
### Why do you have all routes defined in app.js?
For the sake of simplicity. While there might be a better approach,
such as passing `app` context to each controller as outlined in this
[blog](http://timstermatic.github.io/blog/2013/08/17/a-simple-mvc-framework-with-node-and-express/),
I find such style to be confusing for beginners.
It took me a long time to grasp the concept of `exports` and `module.exports`,
let alone having a global `app` reference in other files.
That to me is a backward thinking.
The `app.js` is the "heart of the app", it should be the one referencing
models, routes, controllers, etc.
When working solo on small projects I actually prefer to have everything inside `app.js` as is the case with [this]((https://github.com/sahat/ember-sass-express-starter/blob/master/app.js))
REST API server.
### Why is there no Mozilla Persona as a sign-in option?
If you would like to use **Persona** authentication strategy, use the
[pull request #64](https://github.com/sahat/hackathon-starter/pull/64) as a
reference guide. I have explained my reasons why it could not be merged in
[issue #63](https://github.com/sahat/hackathon-starter/issues/63#issuecomment-34898290).
### How do I switch SendGrid for another email delivery service, like Mailgun or SparkPost?
Inside the `nodemailer.createTransport` method arguments, simply change the service from `'Sendgrid'` to some other email service. Also, be sure to update both username and password below that. See the [list of all supported services](https://github.com/nodemailer/nodemailer-wellknown#supported-services) by Nodemailer.
How It Works (mini guides)
--------------------------
This section is intended for giving you a detailed explanation about
how a particular functionality works. Maybe you are just curious about
how it works, or maybe you are lost and confused while reading the code,
I hope it provides some guidance to you.
### Custom HTML and CSS Design 101
[HTML5 UP](http://html5up.net/) has many beautiful templates that you can download for free.
When you download the ZIP file, it will come with *index.html*, *images*, *css* and *js* folders. So, how do you
integrate it with Hackathon Starter? Hackathon Starter uses Bootstrap CSS framework, but these templates do not.
Trying to use both CSS files at the same time will likely result in undesired effects.
**Note:** Using the custom templates approach, you should understand that you cannot reuse any of the views I have created: layout, home page, api browser, login, signup, account management, contact. Those views were built using Bootstrap grid and styles. You will have to manually update the grid using a different syntax provided in the template. **Having said that, you can mix and match if you want to do so: Use Bootstrap for main app interface, and a custom template for a landing page.**
Let's start from the beginning. For this example I will use [Escape Velocity](http://html5up.net/escape-velocity/) template:

**Note:** For the sake of simplicity I will only consider `index.html`, and skip `left-sidebar.html`,
`no-sidebar.html`, `right-sidebar.html`.
Move all JavaScript files from `html5up-escape-velocity/js` to `public/js`. Then move all CSS files from `html5up-escape-velocity/css` to `public/css`. And finally, move all images from `html5up-escape-velocity/images` to `public/images`. You could move it to the existing **img** folder, but that would require manually changing every `img` reference. Grab the contents of `index.html` and paste it into [HTML To Pug](https://html-to-pug.com/).
**Note:** Do not forget to update all the CSS and JS paths accordingly.
Create a new file `escape-velocity.pug` and paste the Pug markup in `views` folder.
Whenever you see the code `res.render('account/login')` - that means it will search for `views/account/login.pug` file.
Let's see how it looks. Create a new controller **escapeVelocity** inside `controllers/home.js`:
```js
exports.escapeVelocity = (req, res) => {
res.render('escape-velocity', {
title: 'Landing Page'
});
};
```
And then create a route in `app.js`. I placed it right after the index controller:
```js
app.get('/escape-velocity', homeController.escapeVelocity);
```
Restart the server (if you are not using **nodemon**), then you should see the new template at [http://localhost:8080/escape-velocity](http://localhost:8080/escape-velocity).
I will stop right here, but if you would like to use this template as more than just a single page, take a look at how these Pug templates work: `layout.pug` - base template, `index.pug` - home page, `partials/header.pug` - Bootstrap navbar, `partials/footer.pug` - sticky footer. You will have to manually break it apart into smaller pieces. Figure out which part of the template you want to keep the same on all pages - that's your new `layout.pug`.
Then, each page that changes, be it `index.pug`, `about.pug`, `contact.pug`
will be embedded in your new `layout.pug` via `block content`. Use existing templates as a reference.
This is a rather lengthy process, and templates you get from elsewhere,
might have yet another grid system. That's why I chose *Bootstrap* for the Hackathon Starter.
Many people are already familiar with *Bootstrap*, plus it's easy to get started with it if you have never used *Bootstrap*.
You can also buy many beautifully designed *Bootstrap* themes at [Themeforest](http://themeforest.net/), and use them as a drop-in replacement for Hackathon Starter. However, if you would like to go with a completely custom HTML/CSS design, this should help you to get started!
<hr>
### How do flash messages work in this project?
Flash messages allow you to display a message at the end of the request and access
it on next request and only next request. For instance, on a failed login attempt, you would
display an alert with some error message, but as soon as you refresh that page or visit a different
page and come back to the login page, that error message will be gone. It is only displayed once.
This project uses *express-flash* module for flash messages. And that
module is built on top of *connect-flash*, which is what I used in
this project initially. With *express-flash* you don't have to
explicitly send a flash message to every view inside `res.render()`.
All flash messages are available in your views via `messages` object by default,
thanks to *express-flash*.
Flash messages have a two-step process. You use `req.flash('errors', { msg: 'Error messages goes here' }`
to create a flash message in your controllers, and then display them in your views:
```pug
if messages.errors
.alert.alert-danger.fade.in
for error in messages.errors
div= error.msg
```
In the first step, `'errors'` is the name of a flash message, which should match the
name of the property on `messages` object in your views. You place alert messages
inside `if message.errors` because you don't want to show them flash messages are actually present.
The reason why you pass an error like `{ msg: 'Error messages goes here' }` instead
of just a string - `'Error messages goes here'`, is for the sake of consistency.
To clarify that, *express-validator* module which is used for validating and sanitizing user's input,
returns all errors as an array of objects, where each object has a `msg` property with a message
why an error has occurred. Here is a more general example of what express-validator returns when there are errors present:
```js
[
{ param: "name", msg: "Name is required", value: "<received input>" },
{ param: "email", msg: "A valid email is required", value: "<received input>" }
]
```
To keep consistent with that style, you should pass all flash messages
as `{ msg: 'My flash message' }` instead of a string. Otherwise you will just see an alert box
without an error message. That is because, in **partials/flash.pug** template it will try to output
`error.msg` (i.e. `"My flash message".msg`), in other words it will try to call a `msg` method on a *String* object,
which will return *undefined*. Everything I just mentioned about errors, also applies
to "info" and "success" flash messages, and you could even create a new one yourself, such as:
**Data Usage Controller (Example)**
```
req.flash('warning', { msg: 'You have exceeded 90% of your data usage' });
```
**User Account Page (Example)**
```pug
if messages.warning
.alert.alert-warning.fade.in
for warning in messages.warning
div= warning.msg
```
`partials/flash.pug` is a partial template that contains how flash messages
are formatted. Previously, flash
messages were scattered throughout each view that used flash messages
(contact, login, signup, profile), but now, thankfully it is uses a *DRY* approach.
The flash messages partial template is *included* in the `layout.pug`, along with footer and navigation.
```pug
body
include partials/header
.container
include partials/flash
block content
include partials/footer
```
If you have any further questions about flash messages,
please feel free to open an issue and I will update this mini-guide accordingly,
or send a pull request if you would like to include something that I missed.
<hr>
### How do I create a new page?
A more correct way to be to say "How do I create a new route". The main file `app.js` contains all the routes.
Each route has a callback function associated with it. Sometimes you will see 3 or more arguments
to routes. In cases like that, the first argument is still a URL string, while middle arguments
are what's called middleware. Think of middleware as a door. If this door prevents you from
continuing forward, you won't get to your callback function. One such example is a route that requires authentication.
```js
app.get('/account', passportConfig.isAuthenticated, userController.getAccount);
```
It always goes from left to right. A user visits `/account` page. Then `isAuthenticated` middleware
checks if you are authenticated:
```js
exports.isAuthenticated = (req, res, next) => {
if (req.isAuthenticated()) {
return next();
}
res.redirect('/login');
};
```
If you are authenticated, you let this visitor pass through your "door" by calling `return next();`. It then proceeds to the
next middleware until it reaches the last argument, which is a callback function that typically renders a template on `GET` requests or redirects on `POST` requests. In this case, if you are authenticated, you will be redirected to *Account Management* page, otherwise you will be redirected to *Login* page.
```js
exports.getAccount = (req, res) => {
res.render('account/profile', {
title: 'Account Management'
});
};
```
Express.js has `app.get`, `app.post`, `app.put`, `app.delete`, but for the most part you will only use the first two HTTP verbs, unless you are building a RESTful API.
If you just want to display a page, then use `GET`, if you are submitting a form, sending a file then use `POST`.
Here is a typical workflow for adding new routes to your application. Let's say we are building
a page that lists all books from database.
**Step 1.** Start by defining a route.
```js
app.get('/books', bookController.getBooks);
```
---
**Note:** As of Express 4.x you can define you routes like so:
```js
app.route('/books')
.get(bookController.getBooks)
.post(bookController.createBooks)
.put(bookController.updateBooks)
.delete(bookController.deleteBooks)
```
And here is how a route would look if it required an *authentication* and an *authorization* middleware:
```js
app.route('/api/twitter')
.all(passportConfig.isAuthenticated)
.all(passportConfig.isAuthorized)
.get(apiController.getTwitter)
.post(apiController.postTwitter)
```
Use whichever style that makes sense to you. Either one is acceptable. I really think that chaining HTTP verbs on
`app.route` is very clean and elegant approach, but on the other hand I can no longer see all my routes at a glance
when you have one route per line.
**Step 2.** Create a new schema and a model `Book.js` inside the *models* directory.
```js
const mongoose = require('mongoose');
const bookSchema = new mongoose.Schema({
name: String
});
const Book = mongoose.model('Book', bookSchema);
module.exports = Book;
```
**Step 3.** Create a new controller file called `book.js` inside the *controllers* directory.
```js
/**
* GET /books
* List all books.
*/
const Book = require('../models/Book.js');
exports.getBooks = (req, res) => {
Book.find((err, docs) => {
res.render('books', { books: docs });
});
};
```
**Step 4.** Import that controller in `app.js`.
```js
const bookController = require('./controllers/book');
```
**Step 5.** Create `books.pug` template.
```pug
extends layout
block content
.page-header
h3 All Books
ul
for book in books
li= book.name
```
That's it! I will say that you could have combined Step 1, 2, 3 as following:
```js
app.get('/books',(req, res) => {
Book.find((err, docs) => {
res.render('books', { books: docs });
});
});
```
Sure, it's simpler, but as soon as you pass 1000 lines of code in `app.js` it becomes a little difficult to navigate the file.
I mean, the whole point of this boilerplate project was to separate concerns, so you could
work with your teammates without running into *MERGE CONFLICTS*. Imagine you have 4 developers
working on a single `app.js`, I promise you it won't be fun resolving merge conflicts all the time.
If you are the only developer then it's fine. But as I said, once it gets up to a certain LoC size, it becomes
difficult to maintain everything in a single file.
That's all there is to it. Express.js is super simple to use.
Most of the time you will be dealing with other APIs to do the real work:
[Mongoose](http://mongoosejs.com/docs/guide.html) for querying database, socket.io for sending and receiving messages over websockets,
sending emails via [Nodemailer](http://nodemailer.com/), form validation using [express-validator](https://github.com/ctavan/express-validator) library,
parsing websites using [Cheerio](https://github.com/cheeriojs/cheerio), and etc.
<hr>
### How do I use Socket.io with Hackathon Starter?
[Dan Stroot](https://github.com/dstroot) submitted an excellent [pull request](https://github.com/dstroot/hackathon-starter/commit/0a632def1ce8da446709d92812423d337c977d75) that adds a real-time dashboard with socket.io.
And as much as I'd like to add it to the project, I think it violates one of the main
principles of the Hackathon Starter:
> When I started this project, my primary focus was on simplicity and ease of use.
> I also tried to make it as generic and reusable as possible to cover most use cases of
> hackathon web apps, **without being too specific**.
When I need to use socket.io, I **really** need it, but most of the time - I don't. But more
importantly, websockets support is still experimental on most hosting providers. As of October 2013,
Heroku supports websockets, but not until you opt-in by running this command:
```js
heroku labs:enable websockets -a myapp
```
And what if you are deploying to OpenShift? They do support websockets, but it is currently in a
preview state. So, for OpenShift you would need to change the socket.io connect URI to the following:
```js
const socket = io.connect('http://yoursite-namespace.rhcloud.com:8000');
```
Wait, why is it on port 8000? Who knows, and if I didn't run across this [blog post](http://velin-georgiev-blog.appspot.com/blog/set-up-nodejs-express-socketio-application-using-websockets-on-openshift-by-red-hat/)
I wouldn't even know I had to use port 8000.
I am really glad that Heroku and OpenShift at least
have a websockets support, because many other PaaS providers still do not support it.
Due to the aforementioned issues with websockets, I cannot include socket.io as part of the Hackathon Starter. *For now...*
If you need to use socket.io in your app, please continue reading.
First you need to install socket.io:
```js
npm install socket.io --save
```
Replace `const app = express();` with the following code:
```js
const app = express();
const server = require('http').Server(app);
const io = require('socket.io')(server);
```
I like to have the following code organization in `app.js` (from top to bottom): module dependencies,
import controllers, import configs, connect to database, express configuration, routes,
start the server, socket.io stuff. That way I always know where to look for things.
Add the following code at the end of `app.js`:
```js
io.on('connection', (socket) => {
socket.emit('greet', { hello: 'Hey there browser!' });
socket.on('respond', (data) => {
console.log(data);
});
socket.on('disconnect', () => {
console.log('Socket disconnected');
});
});
```
One last thing left to change:
```js
app.listen(app.get('port'), () => {
```
to
```js
server.listen(app.get('port'), () => {
```
At this point we are done with the back-end.
You now have a choice - to include your JavaScript code in Pug templates or have all your client-side
JavaScript in a separate file - in `main.js`. I will admit, when I first started out with Node.js and JavaScript in general,
I placed all JavaScript code inside templates because I have access to template variables passed in from Express
right then and there. It's the easiest thing you can do, but also the least efficient and harder to maintain. Since then I
almost never include inline JavaScript inside templates anymore.
But it's also understandable if you want take the easier road.
Most of the time you don't even care about performance during hackathons, you just
want to [*"get shit done"*](https://www.startupvitamins.com/media/products/13/aaron_levie_poster_black.jpg) before the time runs out.
Well, either way, use whichever approach makes more sense to you. At the end of the day,
it's **what** you build that matters, not **how** you build it.
If you want to stick all your JavaScript inside templates, then in `layout.pug` -
your main template file, add this to `head` block.
```pug
script(src='/socket.io/socket.io.js')
script.
let socket = io.connect(window.location.href);
socket.on('greet', function (data) {
console.log(data);
socket.emit('respond', { message: 'Hey there, server!' });
});
```
**Note:** Notice the path of the `socket.io.js`, you don't actually
have to have `socket.io.js` file anywhere in your project; it will be generated
automatically at runtime.
If you want to have JavaScript code separate from templates, move that inline
script code into `main.js`, inside the `$(document).ready()` function:
```js
$(document).ready(function() {
// Place JavaScript code here...
let socket = io.connect(window.location.href);
socket.on('greet', function (data) {
console.log(data);
socket.emit('respond', { message: 'Hello to you too, Mr.Server!' });
});
});
```
And we are done!
Cheatsheets
-----------
### <img src="https://frontendmasters.com/assets/es6-logo.png" height="34" align="top"> ES6 Cheatsheet
#### Declarations
Declares a read-only named constant.
```js
const name = 'yourName';
```
Declares a block scope local variable.
```js
let index = 0;
```
#### Template Strings
Using the **\`${}\`** syntax, strings can embed expressions.
```js
const name = 'Oggy';
const age = 3;
console.log(`My cat is named ${name} and is ${age} years old.`);
```
#### Modules